

Build a Reliable Drywall Price Estimate Before You Order
A reliable drywall price estimate starts with a simple takeoff, not a guess. Measure every wall and ceiling, choose the correct board type and finish level, add a waste allowance, then separate material, hanging, finishing, delivery, and disposal costs.
- Measure wall area and ceiling area separately.
- Select sheet size, thickness, and specialty board needs.
- Add extra material for cuts, openings, and layout waste.
- Specify the finish level before comparing labor quotes.
- Confirm what each quote includes, especially delivery, cleanup, and sanding.
The biggest estimating mistakes happen when crews price only the sheets. Labor usually makes up the largest share of a drywall job, and finish work can change both the schedule and final budget. A clear material list and scope of work help contractors order accurately, avoid jobsite delays, and compare bids on equal terms.
At Western Wholesale Supply, we are third-generation building materials professionals in Idaho with hands-on experience supporting contractors who need accurate drywall price estimate inputs, dependable supply, and practical job planning. The checklist below breaks the process into clear steps for projects of any size.
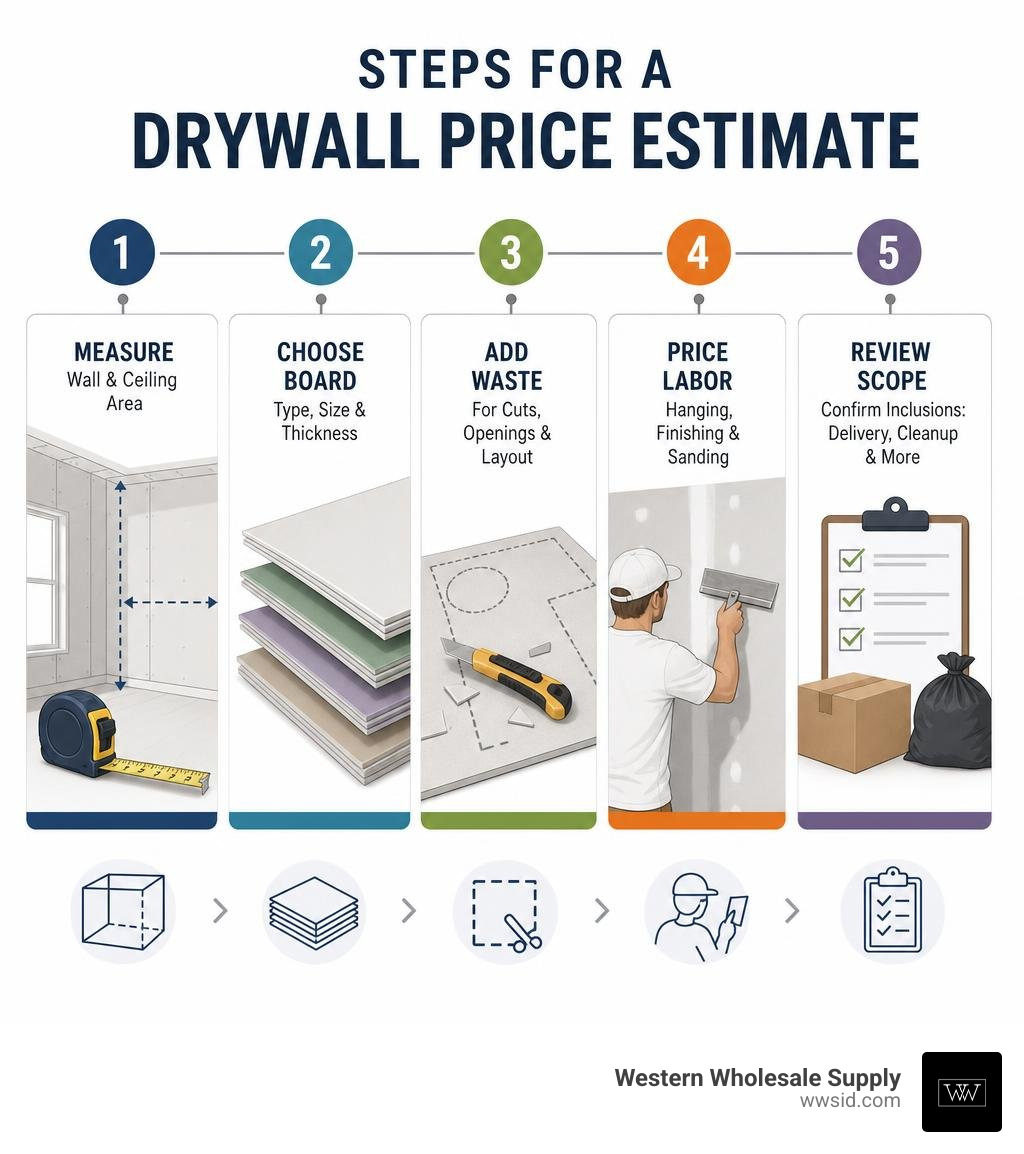
Know your drywall price estimate terms:
Core Factors That Shape Your Drywall Price Estimate
When assembling an accurate estimate, understanding how expenses are allocated across your scope makes all the difference. Many builders find our USG Sheetrock Wallboard Estimator helpful when establishing their initial baseline quantities.
| Cost Component | Project Share | Key Cost Drivers |
|---|---|---|
| Gypsum Wallboard | Moderate Share | Thickness, specialty cores (Type X, moisture, sound), sheet dimensions |
| Finishing Compounds & Tape | Minor Share | Finish level specifications (Level 0 through 5), skim coating |
| Fasteners & Corner Beads | Minor Share | Framing substrate (wood studs vs. steel studs), corner count |
| Hanging Labor | Substantial Share | Ceiling height, room geometry, panel lengths |
| Taping & Finishing Labor | Largest Share | Number of coats, drying windows, sanding standards |
| Logistics & Disposal | Variable Share | Stocking requirements, floor level, jobsite cleanup |
Materials vs Labor Cost Breakdown in 2026
Material expenses make up roughly a third of the overall budget on a standard installation, while skilled labor accounts for the remainder. Materials cover gypsum panels, specialized screws from brands like Grabber or Brighton Best, joint compound, and reinforcing tape. You can explore deeper analysis on how supplies fit into broader project budgets in this detailed breakdown on Drywall Cost 2026: Materials, Installation & Per Sheet Pricing.
Because professional labor represents such a major proportion of overall project costs, even slight changes in framing accuracy or jobsite prep will swing the final bottom line.
Hanging vs Finishing Rate Differentials
A comprehensive bid distinguishes between the hanging phase and the finishing phase:
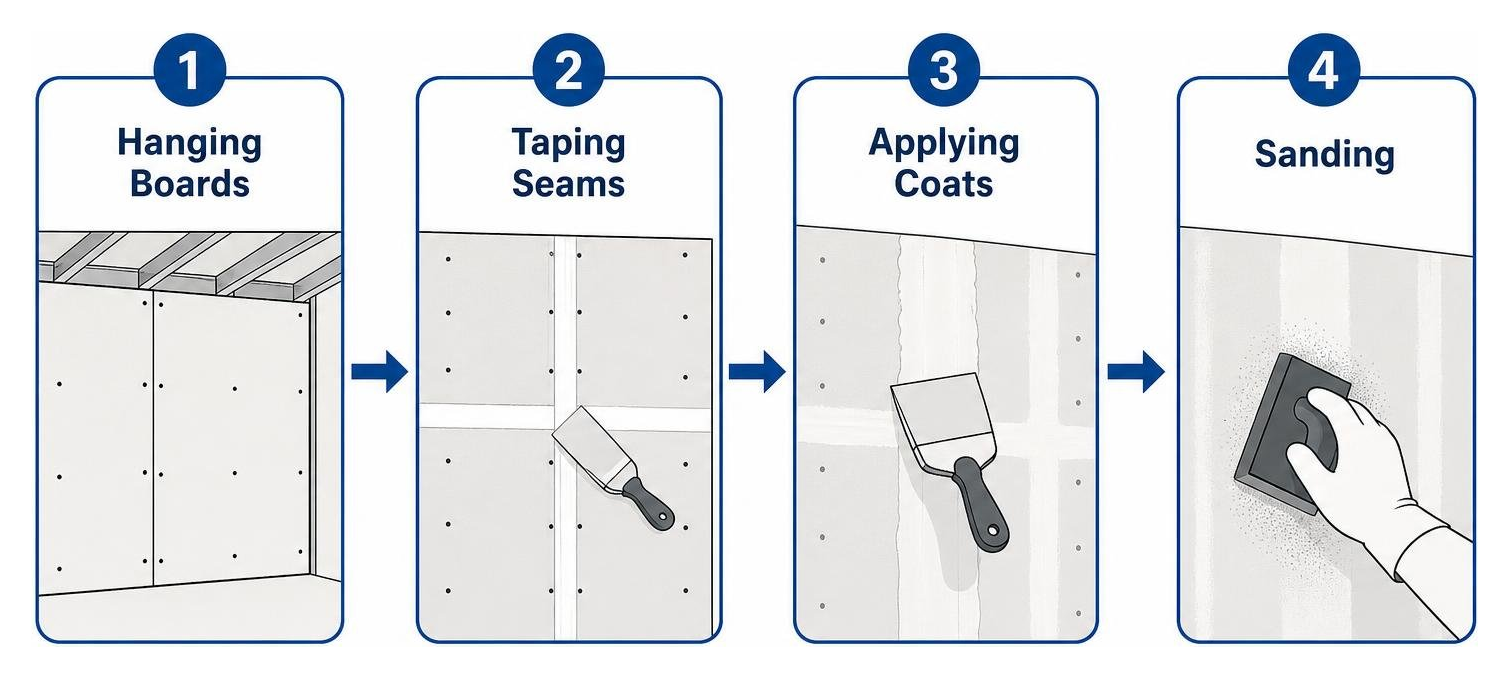
- Hanging (Boarding): Focuses on lifting, measuring, cutting, and securing gypsum panels to framing studs and ceiling joists.
- Finishing (Taping & Mudding): Requires embedding tape into mud, coating fasteners, applying multiple coats of compound, and sanding each layer smooth.
Finishing takes more calendar time than hanging due to required drying intervals between mud applications. Selecting the right drywall compound—such as setting-type compounds for pre-filling joints followed by ready-mixed all-purpose or lightweight topping compounds—ensures smooth work and dependable bond strength.
Step-by-Step Material Takeoff and Quantity Estimation

A thorough takeoff prevents mid-project material shortages. Before placing orders, verify your dimensional takeoffs using our National Gypsum Drywall Materials Calculator.
Calculating Sheets and Accounting for Waste Factors
To determine the number of panels needed:
- Calculate the total wall square footage (perimeter multiplied by ceiling height).
- Calculate the ceiling square footage (room length multiplied by room width).
- Combine wall and ceiling totals to establish total surface area.
- Add a waste factor: 10% for straightforward rectangular rooms, 15% for multi-room layouts with closets, or up to 20% for vaulted ceilings and architectural soffits.
- Divide the total calculated square footage by the panel coverage: 32 square feet for standard 4×8 panels or 48 square feet for 4×12 panels.
Using standard 1/2 inch 4×8 sheetrock works well for smaller residential bedrooms. On larger commercial runs, opting for 12-foot or 14-foot lengths significantly cuts down on the number of butt joints that tapers have to feather out later.
Estimating Fasteners, Joint Compound, and Tape
Calculating your finishing supplies accurately prevents unnecessary stops during the workday:
- Fasteners: Plan on approximately 1 fastener per square foot of installed board (roughly 32 screws per 4×8 sheet on walls and 36 on ceilings). For top-tier hold, we supply Grabber and Brighton Best screws engineered for wood studs and light-gauge steel framing. Explore our full inventory of drywall tools and fasteners.
- Joint Compound: Budget approximately 1 gallon of compound per 100 square feet of wallboard. A standard 4.5-gallon pail will cover about 450 square feet through a standard three-coat finish.
- Drywall Tape: Estimate roughly 0.37 linear feet of tape per square foot of drywall (about 12 linear feet of tape for each 4×8 panel).
- Finishing Knives: Reliable professional results rely on quality blades. We carry industry-standard taping knives and flat boxes from Hyde, USG Sheetrock Tools, Columbia Taping Tools, and Marshalltown in our regional showrooms.
Impact of Panel Types and Finish Levels on Project Cost

Different project zones call for specific drywall cores and surface finishes. Matching your materials to the room’s environmental conditions keeps your installation durable and compliant with local building codes.
How Board Types Alter Your Drywall Price Estimate
Evaluating core types is critical when reviewing your options for 1/2 inch and 5/8 inch panel dimensions:
- Standard 1/2-Inch Gypsum Board: The versatile choice for interior residential walls and standard ceiling spans with 16-inch framing centers.
- 5/8-Inch Type X Board: Formulated with non-combustible glass fibers embedded in a dense gypsum core. Required by fire codes in attached garages, furnace rooms, and shared multi-family walls. It also prevents ceiling sag across 24-inch joist spans.
- Moisture- and Mold-Resistant Panels: Features water-repellent paper or fiberglass matting over a treated core for bathrooms, kitchens, and laundry areas. For tile backer assemblies subject to direct water exposure in showers, cement boards like Durock offer an ideal foundation.
- Sound-Damping Panels: High-density specialty boards like Quietrock EZ Snap incorporate viscoelastic polymers to limit acoustic transfer across home theater walls and office partitions.
When planning commercial spaces or warehouse additions alongside your wallboard packages, thermal performance matters. Maintaining balanced temperatures in large storage or warehouse bays relies on proper thermal insulation packages (Ceilings R-30+, Walls R-13+). For complete acoustic drop ceilings in offices, we also stock CertainTeed acoustical ceiling systems.
Finish Levels 0 Through 5 and Their Budget Impact
The Gypsum Association outlines six specific finish levels that govern labor requirements. You can review how these tiers influence contractor bids in this Drywall Cost Guide and Finish Levels.
- Level 0: Panels are mechanically fastened to studs with no tape, mud, or accessories applied. Suitable for temporary partitions.
- Level 1: Joint tape is embedded in compound at seams and interior angles. Typically specified for plenum areas above dropped ceilings or attic spaces out of public view.
- Level 2: Fastener heads and corner beads are covered with one coat of compound over embedded tape. Common for garages, storage warehouses, and tile substrate applications.
- Level 3: A secondary coat of compound is applied over tape and fasteners. Sanded smooth to accept medium-to-heavy spray textures.
- Level 4: Three distinct coats of compound cover joints, accessories, and fasteners, followed by fine sanding. This is the standard residential and commercial finish for flat, matte, and eggshell paint sheens.
- Level 5: Includes all Level 4 steps plus a complete, uniform skim coat of joint compound applied across the entire surface. Recommended wherever semi-gloss or gloss paints are used, or where severe raking natural light strikes long corridors.
Project Cost Benchmarks: From Single Rooms to Whole Homes
Understanding project scale helps builders estimate labor flow and delivery needs. If your work involves structural additions or full basement finishes in the region, check with your local municipality or review the local building permit schedules to ensure code alignment.
How to Build a Room-by-Room Drywall Price Estimate
- Standard 12×12 Bedroom: With 8-foot walls, a room this size contains approximately 520 square feet of combined wall and ceiling area. Factoring in waste, this space requires about 18 standard 4×8 panels, 1 to 2 pails of compound, 1 roll of tape, and a small box of screws.
- 1,500 Square Foot Residential Home: A home of this footprint represents roughly 5,500 to 6,000 square feet of wall and ceiling surface area. Full projects at this scale require coordinated flatbed delivery and phased stocking.
- Basement Remodels: Basements feature ductwork chases, steel support posts, and perimeter foundation walls. Because of these cutouts, budget for a 15% waste allowance and select moisture-resistant drywall for exterior-facing framed walls.
Explore our full inventory of commercial and residential drywall supplies to stage your upcoming rooms with the right materials.
DIY vs Professional Drywall Installation Economics
Hanging boards with a partner can be a practical way to manage budgets on simple spaces like detached shops or utility rooms. However, taping, mudding, and feathering seams to a Level 4 or Level 5 finish requires developed hand skills.
Many builders and property owners choose a hybrid approach: they hang the gypsum panels themselves to save on upfront labor, then hire an experienced professional drywall finisher equipped with professional flat boxes and specialty taping tools to handle the mudding, joint feathering, and sanding.
Frequently Asked Questions About Drywall Pricing
How much does drywall installation cost per square foot in 2026?
Drywall installation typically breaks down by project size, panel type, and required finish level. Basic hang-only work represents the lower end of labor time, standard Level 4 tape-and-mud installations sit in the balanced middle range, and Level 5 skim coats or complex vaulted ceilings represent premium labor scope.
How many sheets of drywall do I need for a 12×12 room?
A 12×12 room with 8-foot ceilings features 384 square feet of wall area and 144 square feet of ceiling area, totaling 528 square feet. Dividing this by 32 square feet (the coverage of a 4×8 panel) yields 16.5 sheets. Adding a standard 10% waste allowance brings the recommended purchase order to 18 sheets.
Should I deduct door and window openings from my drywall estimate?
In standard estimating practice, do not subtract typical doors and windows (such as single passage doors or regular bedroom windows) from your gross wall measurements. Drywall is hung directly across these rough openings and routed out on the wall, turning the cutout areas into unavoidable off-cuts and scrap waste. Only deduct large openings that exceed 32 square feet, such as multi-panel sliding patio doors or double-car garage entries.
Conclusion
Building a clear material list and understanding your project’s finish requirements ensures smooth workflows from your first cut to final sanding. When you know your exact square footage, core types, and finish levels, ordering materials becomes predictable and simple.
At Western Wholesale Supply, we are an independent, veteran-owned, third-generation family business supplying high-grade wallboard, steel framing, insulation, and acoustical systems. Since 1963, our teams have supported contractors across Eastern Idaho and Western Wyoming with expert counter assistance, dependable on-time jobsite delivery, and dedicated customer service backed by over 60 years of building experience.
Reach out to our team today to review your material takeoff, explore our showroom inventory, or schedule your next delivery through our Western Wholesale Supply building material services.
