

FRP Panel Types, Materials, and Performance Characteristics
Properly managing, prepping, and installing an FRP panel requires disciplined substrate preparation, panel acclimation, and systematic tool management. Before mounting, acclimate panels flat in the workspace for at least 48 hours, ensure the backing wall is flat and dry, and cut sheets with a fine-tooth carbide saw blade. Apply manufacturer-approved adhesive with a notched trowel, embed the sheet using a weighted roller, and leave 1/8-inch perimeter expansion gaps inside trim moldings to allow natural thermal movement.
Fiberglass-reinforced plastic panels are engineered composites built to survive demanding environments. The base construction blends an alkali-free glass fiber matrix with high-grade thermosetting resins, such as unsaturated polyester, vinyl ester, or epoxy. This combination creates an exceptional strength-to-weight ratio. Solid structural composite sheets can reach tensile strengths up to 500 MPa while remaining more than 60% lighter than standard structural steel.
Across commercial construction, transportation, and industrial facilities, these materials provide reliable resistance against corrosion, moisture intrusion, and severe impact. In high-traffic corridors, agricultural confinement, or food processing lines, the composite matrix absorbs heavy kinetic energy without denting or rusting. To review structural configurations in detail, explore our comprehensive guide to FRP wall panels for specifications across various wall builds.
Material Composition and Fire Safety Ratings
Building codes dictate fire ratings based on room occupancy, egress routes, and hazard levels. Wall cladding systems generally fall into two primary testing classifications under ASTM E84:
- Class A (Class I) Fire-Rated Panels: Engineered with specialized flame-retardant resins and mineral fillers. They feature a flame spread index of 0–25 and a low smoke-development value. These are required in public exit corridors, hospitals, commercial school kitchens, cleanrooms, and high-occupancy commercial interiors.
- Class C (Class III) Standard Panels: Suitable for standard utility rooms, car washes, agricultural barns, and storage areas where local building codes do not require strict flame-spread restrictions.
Both classes feature a 100% non-porous finish that repels moisture, harsh sanitation chemicals, grease, and biological agents. For commercial kitchens and slaughterhouses, standard sheets meet USDA and FSIS sanitation standards, ensuring that high-pressure washdowns do not degrade wall integrity.
Solid vs Sandwich Core Configurations
While standard solid sheets (typically 0.090 inches or 2.3 mm thick) are installed directly over solid backing materials, composite sandwich panels integrate an insulated internal core to add structural depth, thermal barriers, and deflection resistance.
Sandwich panels laminate dual fiberglass composite faces over various core chemistries:
- Extruded Polystyrene (XPS): Offers balanced thermal resistance and moisture defense, making it a reliable choice for walk-in coolers, car washes, and agricultural exterior walls.
- Polyurethane (PU) Foam: Provides high thermal efficiency with low thermal conductivity (0.018–0.024 W/m·K). Used extensively to deliver crucial thermal benefits in warehouses (such as meeting Ceilings R-30+ and Walls R-13+ insulation requirements), freezers, and refrigerated transport walls to prevent thermal bridging and condensation.
- Polypropylene (PP) Honeycomb or Aluminum Core: Delivers high rigidity with minimal weight. These cores absorb extreme shear loads and serve as reliable backing substrates for commercial trailers, modular transport shelters, and decorative paneling.
- Plywood / OSB Backed: Factory-laminated structural hybrid panels that can be fastened directly to open framing studs without full gypsum backer board.
For projects requiring lightweight structural durability, specialized manufacturers produce high-performance FRP Sandwich Panels | Custom Composite, Any Core, 3.1m Wide that combine moisture-resistant composite skins with customizable cores.
Comparing Wall Cladding Systems for Durability and Cost
Selecting the right wall cladding system involves balancing initial labor, product costs, and routine maintenance requirements over several decades.
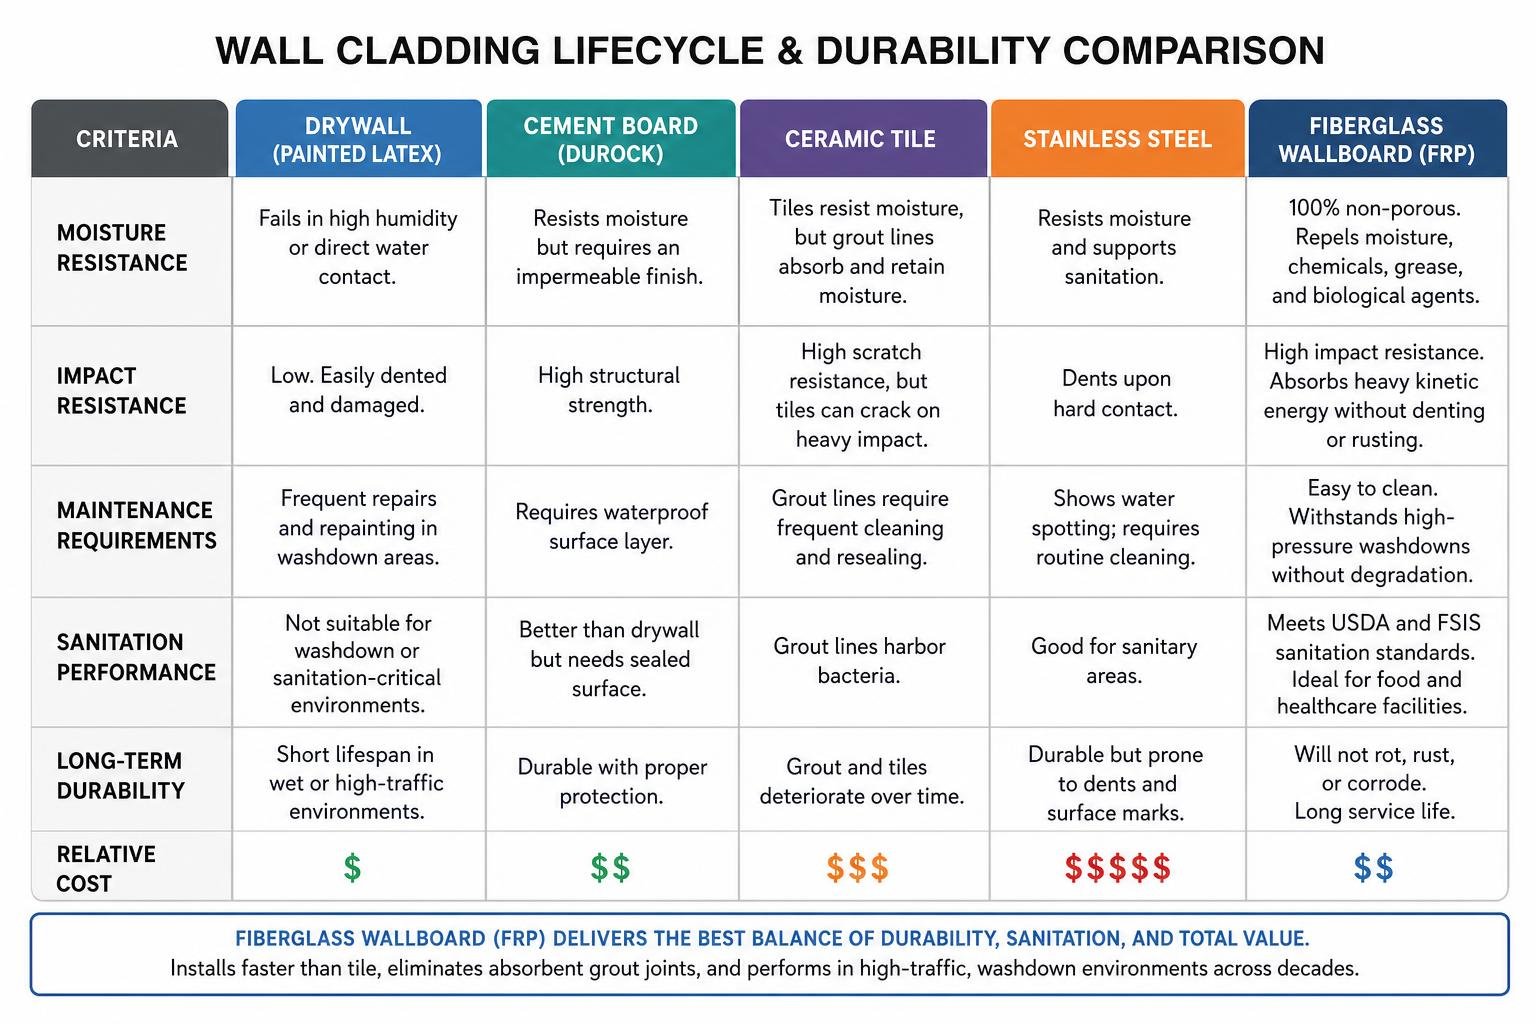
Drywall painted with standard latex fails rapidly under high humidity or direct water contact. While impact-resistant drywall, sound-reducing boards like Quietrock EZ Snap, or cement backer boards like Durock provide a sturdy structural foundation, exposed wall surfaces in washdown environments demand an impermeable top layer. Ceramic tile provides high scratch resistance, but continuous grout lines harbor bacteria, require frequent resealing, and crack under heavy impacts. Stainless steel offers sanitary performance in medical and cooking areas, yet it carries high material costs, dents upon hard contact, and reveals water spotting.
Fiberglass wallboard strikes an effective balance. It installs faster than tile, eliminates absorbent grout joints, and will not rot, rust, or corrode. To assess commercial wall requirements across hospitality, retail, and healthcare, check our guide to commercial FRP panels for practical material planning.
Lifecycle Maintenance and Cost Comparison
The long-term lifecycle value of wall cladding systems is compared below:
| Cladding Material | Initial Installation Labor | Impact & Dent Resistance | Moisture & Mold Defense | Joint & Grout Maintenance | Typical Service Lifespan |
|---|---|---|---|---|---|
| FRP Composite Panels | Low to Moderate (Rapid sheet coverage) | Very High (Up to 300x glass impact) | Impermeable non-porous face | Low (Sanitary PVC moldings or silicone) | 20–30+ Years |
| Ceramic Tile | High (Extensive manual layout & grouting) | Moderate (Vulnerable to chipping/cracking) | Moderate (Glazed face / porous grout) | High (Requires periodic scrubbing & resealing) | 10–20 Years (Grout fails earlier) |
| Stainless Steel Sheets | High (Heavy handling & precision fitting) | Moderate (Prone to surface denting/creasing) | Impermeable non-porous face | Low (Welded or mechanical batten trims) | 25–30 Years |
| Wood / Plywood Cladding | Low to Moderate (Simple carpentry) | Moderate (Prone to gouging & splintering) | Poor (Absorbs moisture, rots, swells) | Moderate (Vulnerable to moisture ingress) | 5–10 Years (In wet areas) |
Step-by-Step Installation Techniques and Tool Management
A clean, long-lasting installation starts with disciplined substrate preparation and systematic tool staging. FRP sheets expand and contract with fluctuations in temperature and humidity, meaning the installation team must account for structural movement at every floor, ceiling, and panel seam. Review our ultimate guide to fiberglass wall panels for comprehensive trade tips on workspace layout and site storage.
Traditional Fasteners and FRP Panel Adhesives
Solid sheets require continuous backing support over flat drywall, Quietrock EZ Snap panels, exterior-grade plywood, or cement backer board such as Durock.
- Adhesive Selection: For porous substrates like unpainted drywall or plywood, use high-tack, water-based FRP mastic. For non-porous substrates (such as existing tile or glossy surfaces) or sandwich panels, apply high-strength polyurethane-based or solvent-based adhesives. For complete adhesive chemistry details, see our guide to FRP adhesives.
- Mechanical Fasteners: In demanding washdown environments or high-vibration commercial spaces, pair adhesive with mechanical fasteners. Use corrosion-resistant nylon drive rivets or low-profile truss-head screws from Grabber or Brighton Best. Drill oversize pilot holes (typically 1/8-inch wider than the fastener shank) through the sheet to allow thermal movement without buckling.
- Molding and Trims: Install matching division bars (H-channels), inside corners, outside corners, and end caps (J-moldings). Leave an expansion gap of 1/8 inch (3.2 mm) between panels and within molding channels, increasing to 1/4 inch (6.4 mm) at floor and ceiling intersections.
Concealed Mounting Systems for Seamless FRP Panel Alignment
When wall designs require a modern aesthetic without exposed rivet heads, or when panels need occasional removal for plumbing and electrical access, concealed clip systems provide a practical alternative.
Concealed mounting clips engage male and female interlocking hardware anchored to the wall substrate and panel backing:
- Substrate Preparation: Fasten female clip housings directly to studs, drywall, or furring strips using low-profile mechanical screws.
- Layout Alignment: Insert center-point alignment guides into female receivers. Press the panel against the wall so the center points leave precise drill markings on the rear of the FRP sheet.
- Male Clip Installation: Drill blind pilot holes into the rear panel surface and drive threaded male fasteners flush.
- Panel Engagement: Align the panel over the wall receivers and apply firm pressure across the face until all clips click into place.
This system provides a clean, fastener-free aesthetic, isolates mechanical vibration, accommodates thermal movement, and allows contractors to remove individual panels for wall-cavity servicing without damaging the surrounding substrate.
Step-by-Step Workflow for Professional Wall Panels
To execute a clean, code-compliant installation, assemble the proper tools and follow this sequence:
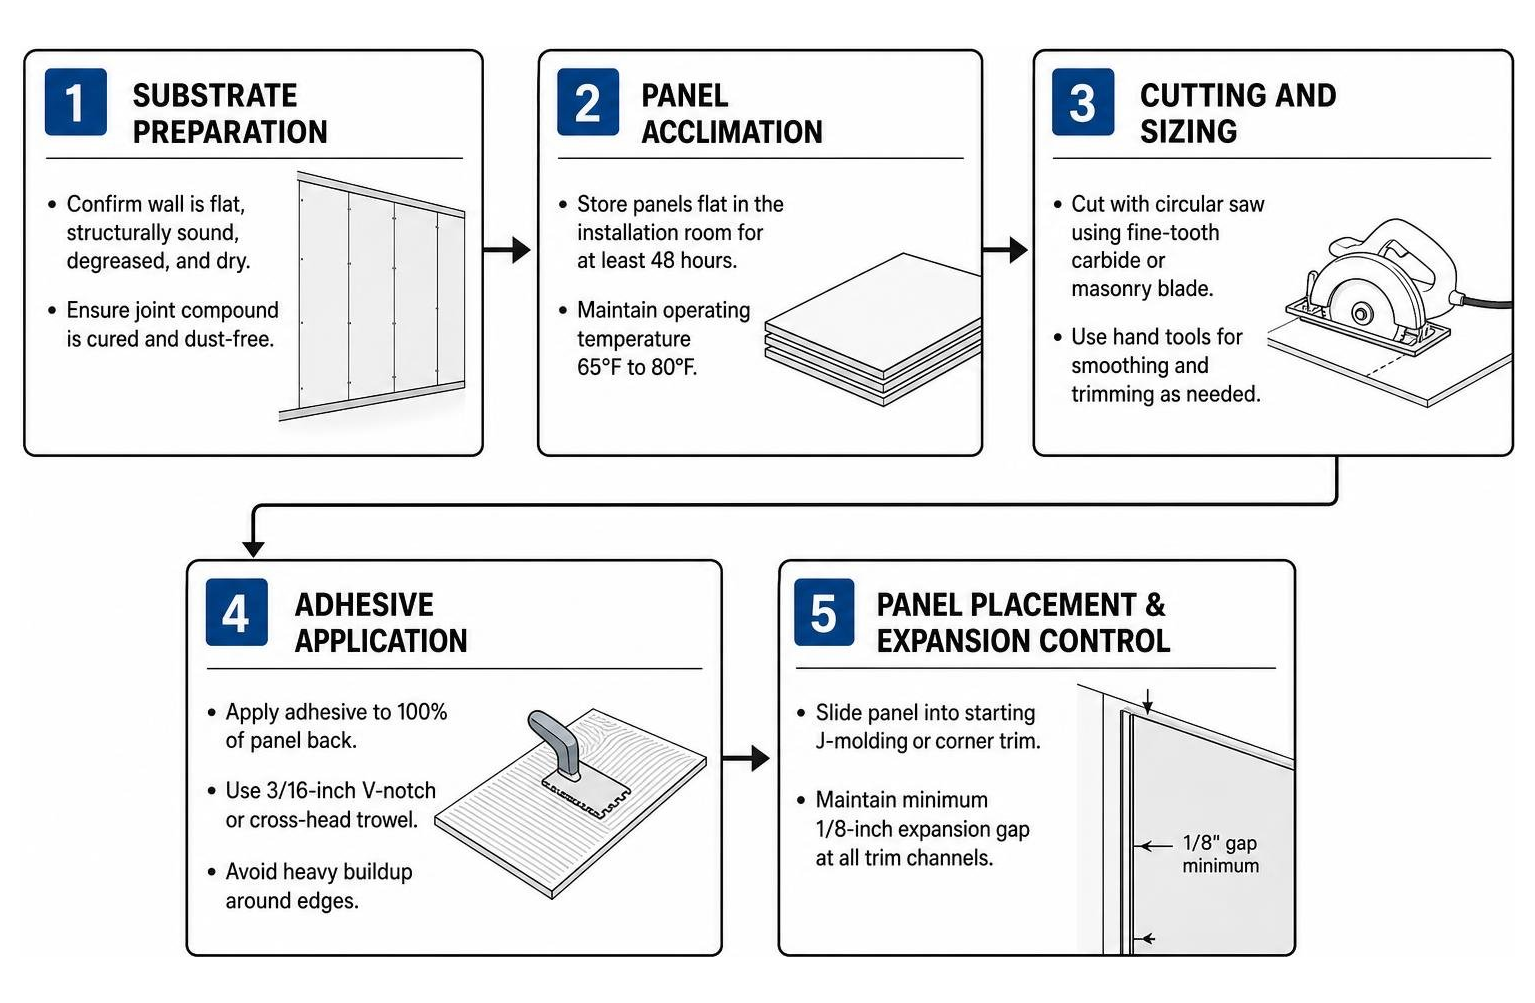
- Substrate Preparation: Confirm the wall is flat, structurally sound, degreased, and dry. Ensure any joint compound on drywall is thoroughly cured and wiped free of dust.
- Panel Acclimation: Store panels flat in the installation room for at least 48 hours at operating temperature (65°F to 80°F) to stabilize dimensions.
- Cutting and Sizing: Cut sheets using a circular saw equipped with a fine-tooth carbide blade or masonry blade. For smooth drywall edges or trimming surrounding materials, keep your professional hand tools on hand, including Marshalltown, Columbia Taping Tools, Hyde, or USG Sheetrock Tools drywall taping knives.
- Adhesive Application: Apply adhesive to 100% of the panel back using a 3/16-inch V-notch or cross-head trowel. Avoid thick adhesive buildup around edges to prevent squeeze-out into molding tracks.
- Panel Placement & Expansion Control: Slide the panel into the starting J-molding or corner trim. Maintain a minimum 1/8-inch expansion gap at all trim channels.
- Rolling the Surface: Run a 50 lb to 100 lb segmented linoleum/panel roller firmly across the entire face, starting from the center and working outward to eliminate trapped air pockets and ensure complete adhesive contact.
- Sealing Seams: Apply a continuous bead of 100% sanitary silicone sealant inside all molding channels and transition edges to create a waterproof barrier.
Maintenance Protocols and Environmental Sanitation
FRP wall panels maintain their surface integrity under rigorous industrial sanitization schedules. The non-porous gel coat prevents oils, grease, and chemicals from penetrating the composite core, eliminating common issues like mold, mildew, and bacteria growth.
In commercial facilities, maintenance teams can sanitize walls using:
- Warm water and mild non-abrasive detergents for daily wipe-downs.
- High-pressure hot water washers (up to 1,200 PSI at safe distances) for large processing floors.
- Industrial steam cleaning for deep degreasing and sterilization.
For specific cleanroom guidelines, review our practical guide to FRP panel options for labs to align cleaning procedures with contamination-control standards.
Cleaning Commercial Kitchens and Healthcare Facilities
Commercial kitchens, hospitals, and veterinary clinics face harsh sanitation demands:
- Commercial Kitchens: Fryers and cooking lines produce aerosolized grease. FRP panels in these cook line splash zones resist heavy alkaline degreasers without dulling or yellowing.
- Healthcare and Surgical Suites: Operating rooms and patient bays require continuous sanitization with quaternary ammonium compounds, bleach solutions, and hydrogen peroxide vapors. Composite wallboards withstand these medical-grade disinfectants without cracking or discoloring.
Custom Finishes, Colors, and Protective Gel Coats
Fiberglass panels are available in several surface textures to balance aesthetic goals and cleanability:
- Pebbled (Embossed) Finish: Features a textured surface that hides scuffs, scratches, and minor tool strikes, making it standard for high-traffic corridors, schools, and utility rooms.
- Ultra-Smooth Gel Coat: Provides a flat, glass-like finish that prevents residue collection, making it suitable for cleanrooms, pharmaceutical spaces, and operating environments.
- Custom Printed & Architectural Colors: High-resolution digital printing and colored gel coats can replicate stone, woodgrain, and custom graphics without losing composite durability.
For architectural and decorative specifications, explore our guide on FRP panel boards and liners to select the right textures and face designs.
Frequently Asked Questions about Wallboard Management
What is the difference between Class A and Class C fire ratings?
Class A panels undergo stringent fire testing to achieve a Flame Spread Index of 25 or lower and a low smoke-development value under ASTM E84 standards. They are required in public hallways, schools, healthcare corridors, and high-occupancy commercial settings. Class C panels carry standard flame-spread ratings suitable for agricultural structures, car washes, private utility rooms, and small workshops where commercial life-safety codes do not mandate Class A materials.
Can panels be installed directly over existing tile or drywall?
Yes. Panels can be adhered directly over sound, flat drywall, Quietrock EZ Snap acoustic panels, cement board like Durock, or existing ceramic tile. When bonding over glossy ceramic tile or sealed drywall, contractors must thoroughly degrease the wall, scuff sand glossy surfaces with coarse-grit paper to create a mechanical anchor profile, and use an approved polyurethane-based panel adhesive rather than a water-based mastic.
How do concealed mounting clips compare to standard adhesives?
Standard adhesive applications provide a permanent, low-profile, and economical bond suited for continuous wall runs. Concealed mounting clips eliminate exposed fastener heads while allowing panels to be removed without damaging the substrate. This gives building teams ongoing access to in-wall mechanical, plumbing, and electrical lines behind the panel system.
Conclusion
Planning and executing a durable wall cladding system depends on selecting the right panel chemistry, calculating thermal expansion, and pairing the installation with reliable fasteners and adhesives. Whether building out commercial kitchens, sanitization bays, or institutional corridors across Idaho Falls, Pocatello, Jackson, Twin Falls, or Western Wyoming, choosing high-performance building materials protects wall structures against moisture, impact, and daily operational wear.
Our team at Western Wholesale Supply provides over 60 years of expertise in stocking and delivering commercial drywall, steel framing, insulation, CertainTeed acoustical ceiling systems, and composite panels. Connect with our supply specialists and explore our guide to commercial FRP panels to keep your commercial project on schedule and built to last.
