

Start With the Right Ceiling Soundproofing Strategy
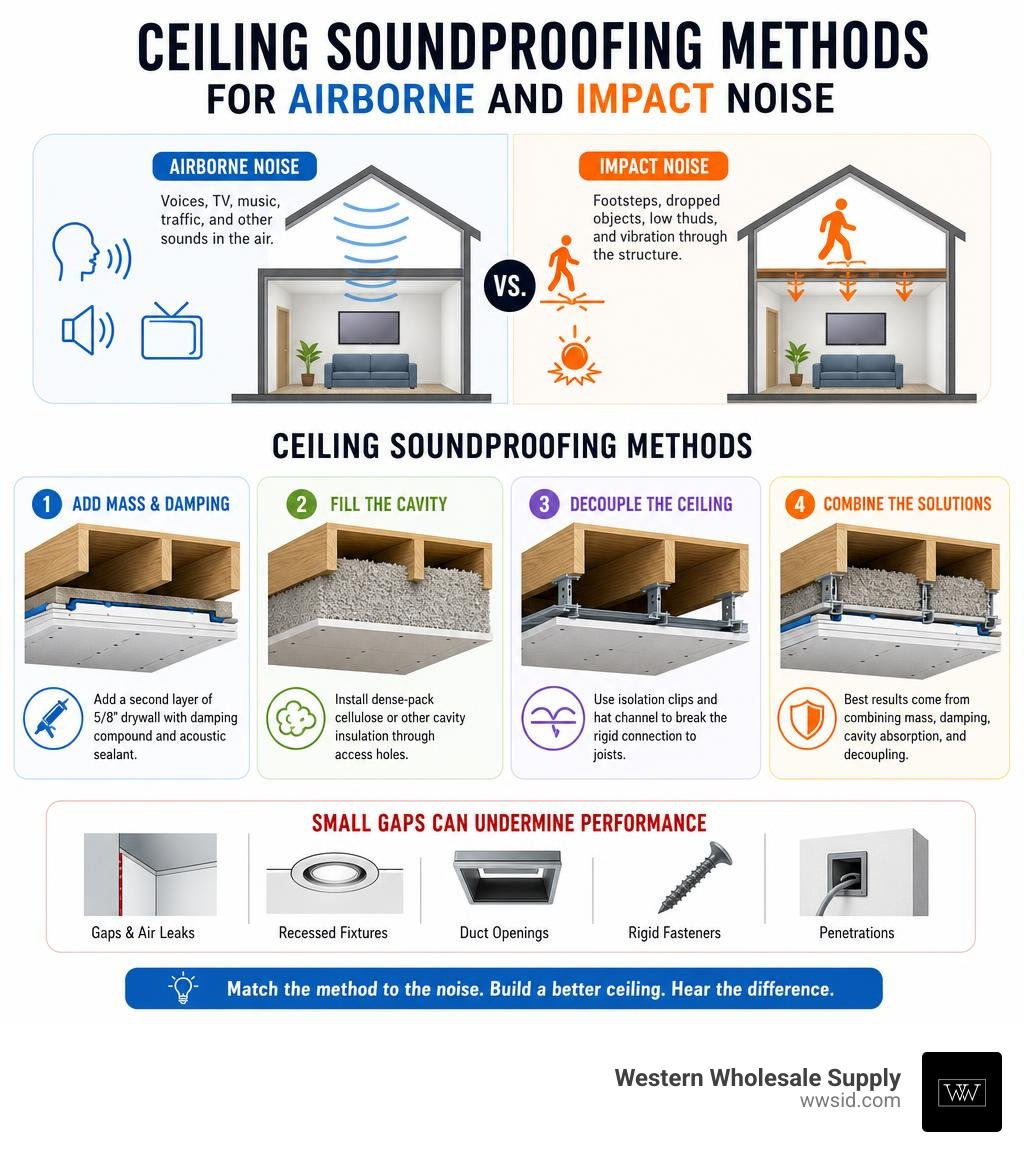
For a drywall soundproofing ceiling, start by matching the fix to the noise. Add a second layer of 5/8-inch drywall with acoustic sealant and damping compound to reduce voices, TV sound, and other airborne noise. For footsteps, dropped objects, and low thuds, the stronger solution is a new ceiling on isolation clips and hat channel – but that usually requires removing the existing drywall first.
If demolition is not an option, dense-pack cellulose or other cavity insulation can be installed through small access holes, then covered with added drywall. A full cavity fill can improve airborne sound isolation by roughly 6 dB, but insulation alone will not stop vibration traveling through joists.
The best results come from combining four ideas: mass, damping, cavity absorption, and decoupling. Small gaps, recessed fixtures, duct openings, and rigid screws can undermine an otherwise solid assembly.
At Western Wholesale Supply, we are third-generation building-materials professionals in Idaho with hands-on experience supporting contractors who specify drywall, insulation, and framing systems. In this guide to drywall soundproofing ceiling work, we will help you choose an approach that fits the noise problem, the existing structure, and the scope of the job.
Understanding the Core Mechanics of a Drywall Soundproofing Ceiling
Sound isolation often seems mysterious until you break down the physics behind it. When sound waves collide with a building assembly, they do not just bounce off; they travel through every connected solid element and air gap available. Understanding how energy moves through a ceiling assembly allows you to pinpoint the weak links before spending a dime on materials. Check out our detailed guide to drywall soundproofing for foundational concepts on how sound waves travel through structural assemblies.
Acoustic performance in construction relies heavily on two standard testing metrics:
- Sound Transmission Class (STC): A single-number integer rating that measures how effectively an interior wall or floor-ceiling assembly attenuates airborne sound transmission, such as speech, television volume, and musical instruments, tested per ASTM E90 standards.
- Impact Insulation Class (IIC): An acoustic metric evaluating how well a floor-ceiling structure blocks structure-borne impact vibrations, such as footsteps, moving furniture, and dropped items.
Beyond direct transmission, sound often bypasses solid barriers through flanking transmission. Flanking occurs when acoustic energy travels around a ceiling assembly via indirect pathways—such as shared HVAC ductwork, wall cavities, unsealed electrical junction boxes, and perimeter framing. A soundproofing strategy must address both direct acoustic wave propagation and structural flanking routes to achieve lasting quiet.
Airborne Noise vs. Structure-Borne Impact Noise
Before selecting your materials, determine whether you are dealing with airborne noise, structure-borne impact noise, or a frustrating mix of both.
Airborne noise begins in the air. Examples include conversational noise, dog barks, and television speakers. These sound waves strike the upstairs subfloor or downstairs ceiling, causing the sheetrock to vibrate and radiate sound into the room below.
Structure-borne impact noise, by contrast, starts with direct mechanical impact. Heavy footstep thuds, dropped toys, and appliance vibrations shake the floorboards directly. This physical shock transmits straight down into the floor joists via mechanical resonance. From the joists, it transfers directly into the rigidly screwed ceiling drywall, transforming the entire ceiling plane into a giant speaker cone.
Because impact vibrations travel directly through continuous structural framing, simply adding a thicker board will not solve severe footfall noise. Addressing impact noise demands decoupling.
The Four Acoustic Pillars: Mass, Decoupling, Absorption, and Damping
High-performance ceiling soundproofing relies on four complementary physical principles. Omitting any one of these pillars limits the overall effectiveness of your ceiling system.
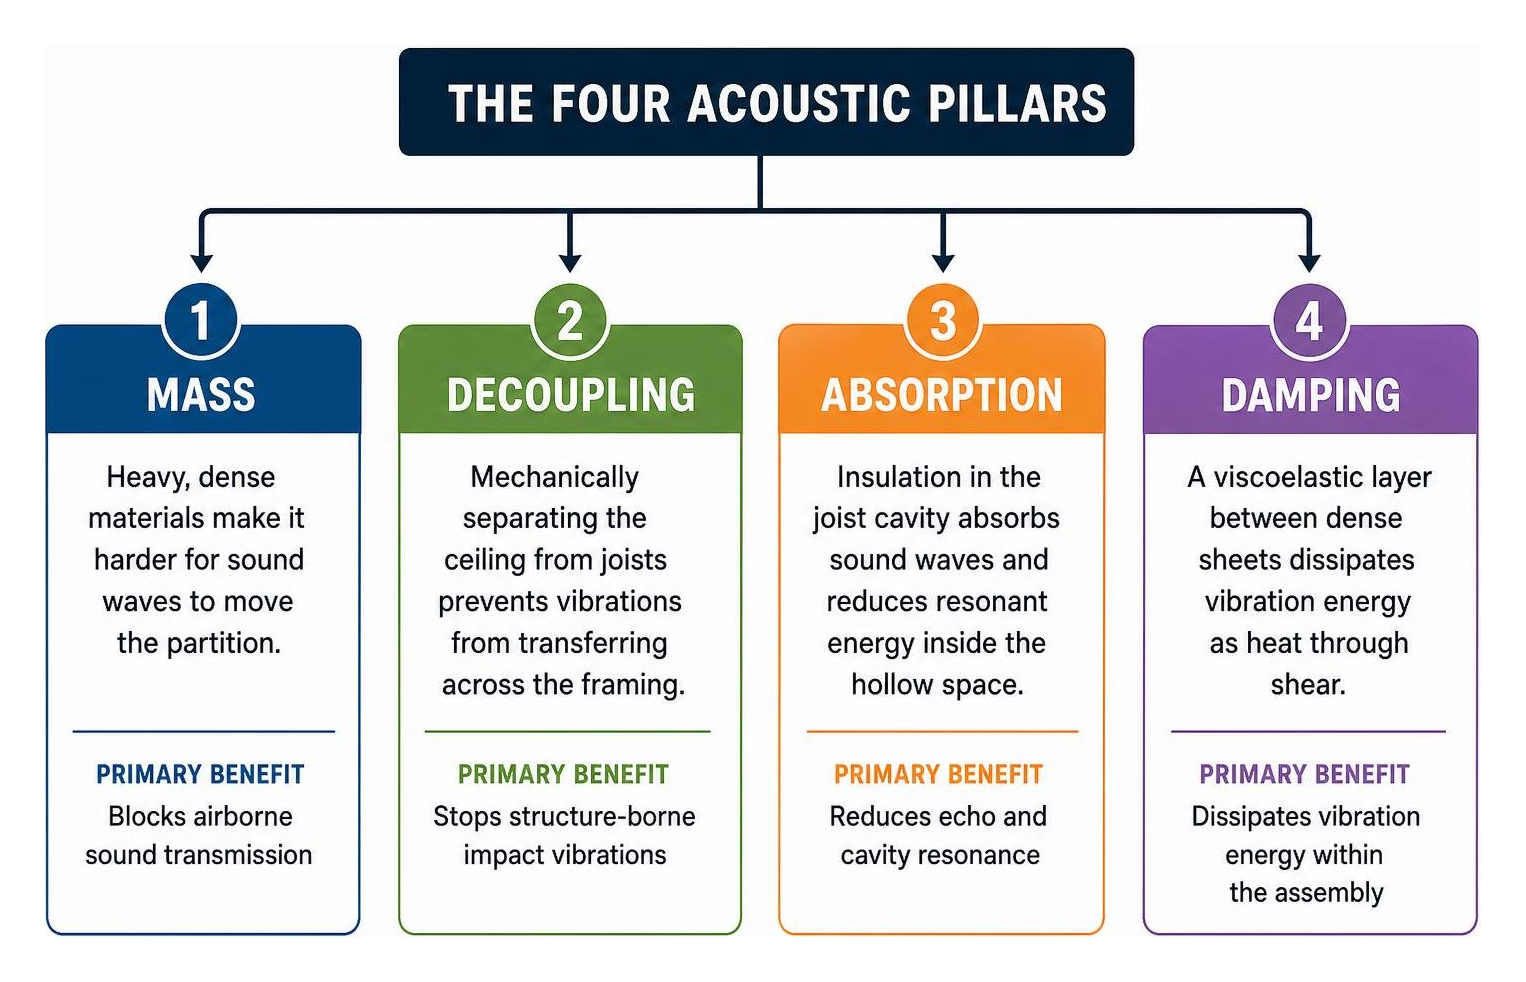
- Mass: Heavy, dense materials make it harder for sound waves to move the partition. Adding high-density sheets, such as 5/8-inch Type X gypsum board, stops airborne frequencies from passing through.
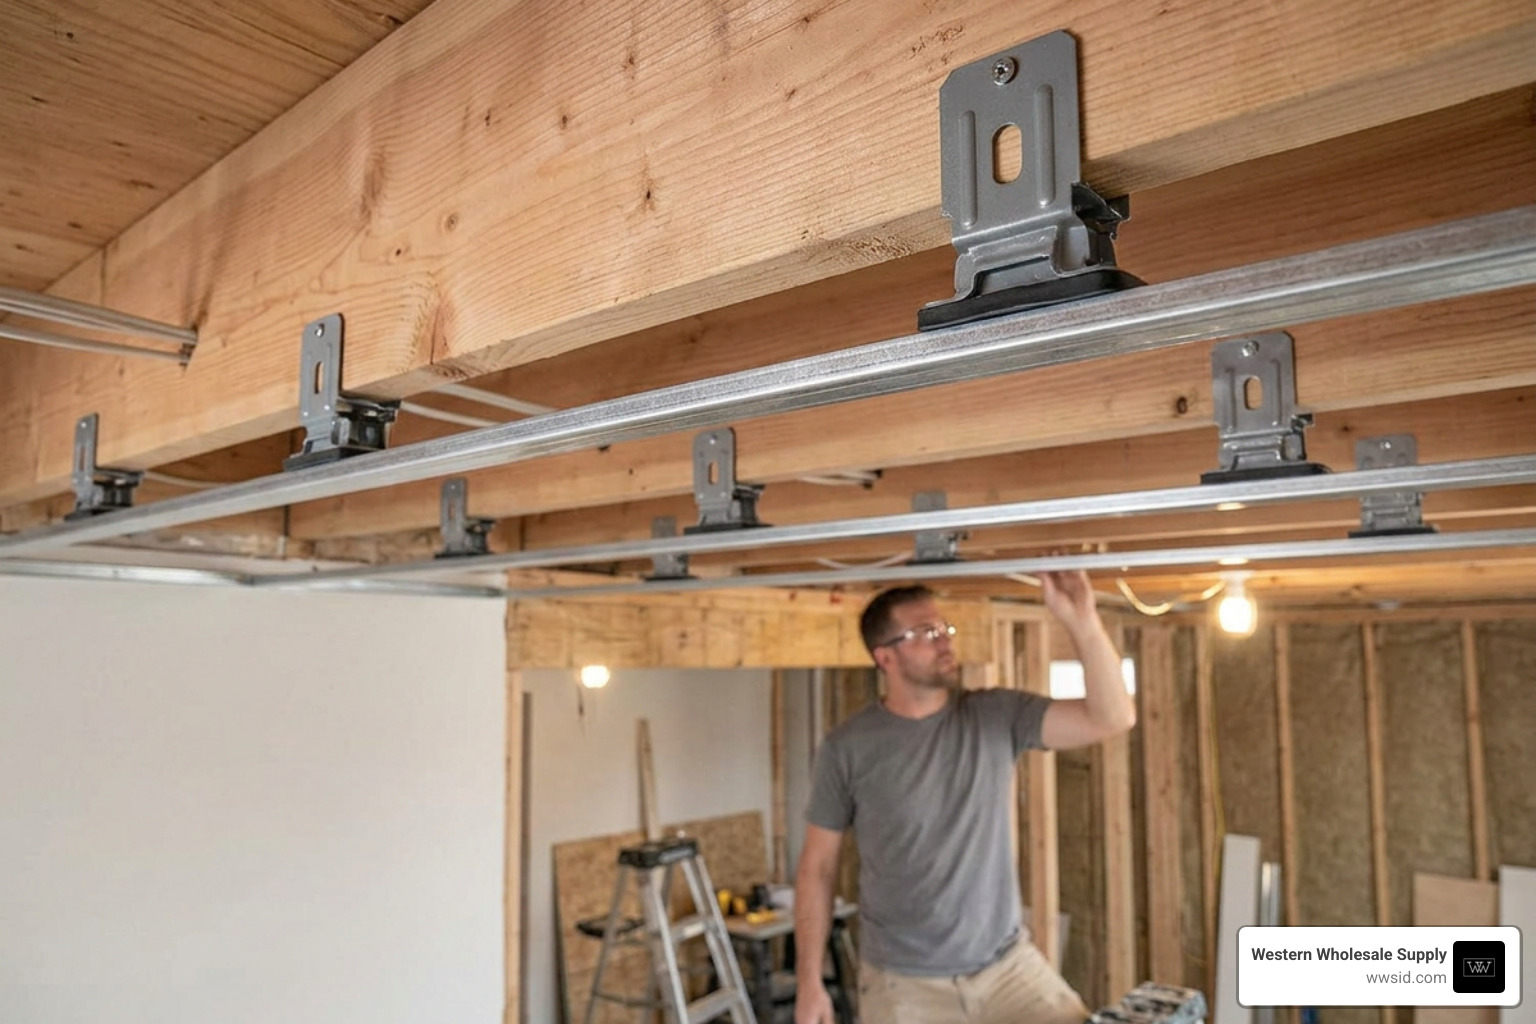
- Decoupling: Mechanically separating the ceiling drywall from the structural joists prevents physical vibrations from jumping across the framing. This is accomplished using specialized rubber isolation clips and metal hat channels.
- Absorption: Open joist cavities act like acoustic echo chambers. Installing open-cell batt insulation or dense fibrous fill absorbs resonant sound waves bouncing inside the hollow framing bay.
- Damping: Constrained layer damping uses a viscoelastic polymer layer between two dense sheets. As sound waves pass through the assembly, the polymer shears, dissipating acoustic vibration energy into microscopic amounts of thermal energy.
| Acoustic Principle | Primary Mechanism | Best Used For | Typical Materials |
|---|---|---|---|
| Mass | Adds physical density to block sound penetration | Airborne voices, television audio | 5/8″ Type X Gypsum, Quietrock EZ Snap |
| Decoupling | Breaks mechanical contact between surfaces | Heavy footsteps, structural impact thuds | RSIC-1 Clips, 25-gauge Hat Channel |
| Absorption | Eliminates hollow cavity resonance and echo | Mid-to-high frequency airborne sound | Mineral wool batts, Fiberglass insulation |
| Damping | Converts mechanical shear vibration into heat | Low-frequency bass, general resonance | Green Glue Compound, Viscoelastic drywall cores |
Comparing Retrofit and Demolition Acoustic Strategies
When retrofitting an existing ceiling, you face an important strategic decision: tear out the existing drywall down to the bare joists, or install a non-destructive retrofit over the existing surface?
Full demolition allows you to inspect the subfloor from beneath, pack the joist cavities completely with dense acoustic insulation, and install mechanical isolation clips directly to the bare wood or steel joists. However, tearing down an overhead ceiling generates significant dust and demolition debris.
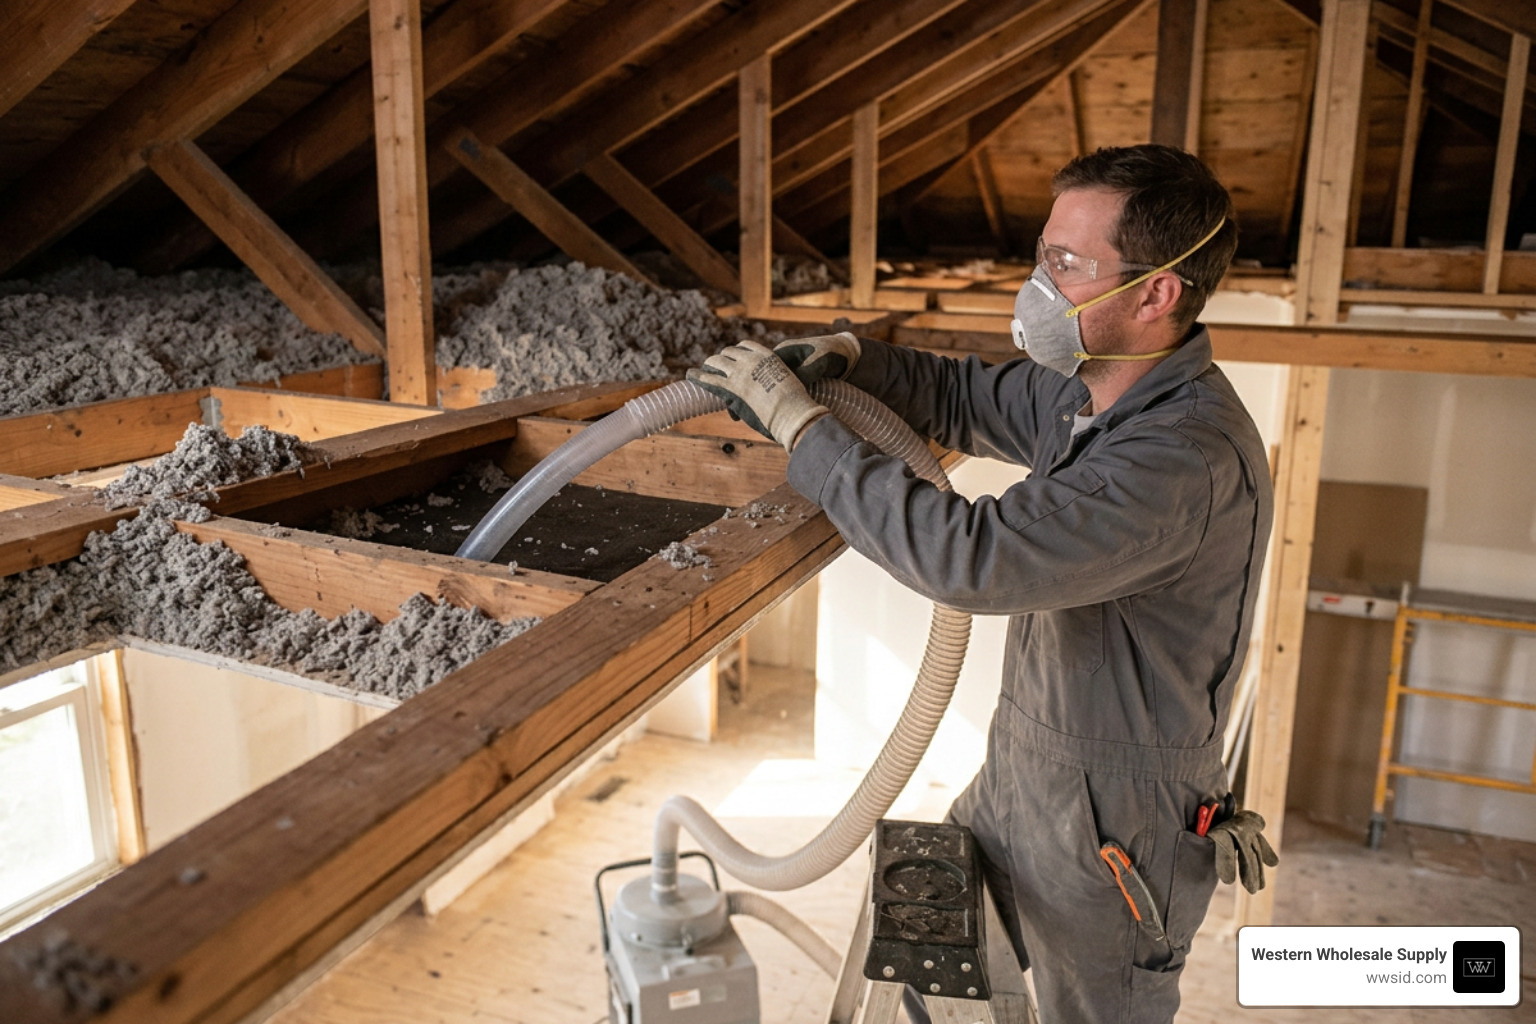
If ceiling demolition is out of the question, non-destructive retrofits offer a viable path forward. If the cavities are completely hollow, contractors can drill small access holes into each joist bay to inject dense-pack cellulose or loose-fill insulation, then patch the openings. You can then mount a second layer of sound-damping drywall over the existing ceiling. While a no-demo retrofit will not eliminate severe structural impact thuds as effectively as mechanical decoupling, it significantly cuts airborne chatter with far less mess and preserves valuable headroom.
Selecting Materials for Your Drywall Soundproofing Ceiling
Selecting quality materials ensures your ceiling meets structural and acoustic goals. When sourcing drywall, choose heavy 5/8-inch Type X gypsum board rather than standard 1/2-inch or lightweight ceiling boards. The added mass of Type X core provides superior sound-blocking performance and dependable fire resistance. In moisture-prone transitions or ceiling-adjacent tile applications, durable cement backer boards like Durock provide high-density mass and rigid structural support.
For projects demanding high STC ratings with minimal overall thickness, pre-engineered constrained-layer panels like SoundBreak® XP® Gypsum Board or Quietrock EZ Snap incorporate internal viscoelastic damping polymers directly between dense gypsum layers. Review a comprehensive guide to sound dampening drywall options to evaluate single-panel composite solutions against custom field-applied damping compounds.
For cavity absorption, mineral wool or fiberglass batts provide clean, consistent sound absorption. Beyond acoustic isolation, proper cavity insulation delivers substantial thermal benefits in warehouses, where meeting standards such as Ceilings R-30+ and Walls R-13+ ensures long-term energy efficiency and stable indoor climate control. Fasteners should always be specified correctly: use heavy-duty screws from reliable manufacturers like Brighton Best or Grabber to hold multi-layer assemblies securely overhead without stripping out.
Non-Destructive Double Drywall Layering vs. Full Joist Decoupling
Understanding the difference between multi-layer direct attachment and true mechanical decoupling helps you avoid disappointing results.
In a direct-attachment scenario, you apply viscoelastic damping compound between the existing ceiling and a new layer of 5/8-inch drywall, securing it directly through to the joists with long Grabber drywall screws. This technique significantly elevates the STC rating against voices and music without sacrificing more than 5/8 inch of ceiling height. Learn the exact process in our article on how to double drywall for soundproofing without major renovations.
However, if your primary issue is upstairs footfall vibration, direct attachment leaves a mechanical bridge intact. To sever that path, you must strip the ceiling, fasten resilient sound isolation clips (such as RSIC-1 clips) to the sides or bottoms of the joists, snap in metal hat channels, and screw your drywall exclusively to the suspended hat channel. This physical break eliminates acoustic short-circuiting.
Step-by-Step Ceiling Soundproofing Installation Guide
Installing an overhead acoustic ceiling system requires careful planning, proper safety equipment, and the right tools. Working overhead with heavy 5/8-inch sheets is physically demanding; never attempt to hold large gypsum panels against a ceiling manually on ladders. Rent or purchase a reliable drywall panel lift to position and hold your sheets tightly against framing while driving fasteners.
Before beginning, outfit yourself and your crew with ANSI-approved eye protection, sturdy work gloves, steel-toed boots, and proper NIOSH dust masks. Mark your framing layout clearly on the perimeter walls so you never have to guess where your joists or channels sit once panels are raised.
Step-by-Step Execution of a Drywall Soundproofing Ceiling Installation
Follow this proven sequence to construct a decoupled, high-STC drywall ceiling assembly:
- Expose and Inspect Framing: Strip the existing ceiling down to the bare joists. Inspect the underside of the subfloor for loose boards or squeaks. Drive structural screws into squeaky subfloor boards from below to eliminate mechanical friction before closing the space.
- Install Cavity Absorption: Place mineral wool or fiberglass batts snugly into the open joist cavities. Consult the Owens Corning Canada Wall & Floor Assembly Guide for verified acoustic floor-ceiling assembly ratings. Adding a full fill of fluffy insulation in the cavity can get you about a 6dB increase in STC, which is noticeable by most people. Avoid compressing the batts excessively, as loose, uncompressed fibers absorb acoustic energy best.
- Mount Acoustic Isolation Clips: Fasten rubber-isolated RSIC-1 clips directly to the bottom edges of the joists using heavy-duty framing screws from Grabber or Brighton Best. Space clips at a maximum of 48 inches along each joist and no more than 24 inches on center across joist runs.
- Snap in Furring Hat Channels: Snap 25-gauge metal hat channels (7/8-inch dry-wall furring channel) firmly into the isolation clips. Overlap channel splices by 6 inches and fasten them together with pan-head framing screws.
- Hang the Base Drywall Layer: Raise the first layer of 5/8-inch Type X drywall perpendicular to the hat channels using your drywall lift. Fasten the board directly to the hat channel using 1-1/4-inch fine-thread drywall screws. Leave a consistent 1/4-inch expansion gap around the entire room perimeter.
- Apply Viscoelastic Damping Compound: Before lifting the second drywall layer, lay the sheet flat on sawhorses and apply acoustic damping compound (such as Green Glue) using a standard applicator gun. Dispense two full tubes per 4×8-foot sheet in an irregular, sweeping pattern.
- Fasten the Face Drywall Layer: Immediately raise the second layer of 5/8-inch drywall against the first, staggering all panel seams by at least 24 inches in both directions. Fasten through both layers into the hat channel using 1-5/8-inch screws. Never drive screws through the hat channel into the wood joists above, as this creates a rigid acoustic bridge.
- Tape and Finish the Surface: Finish all flat joints and screw dimples using professional-grade setting-type joint compound and paper tape. For smooth, consistent results, equip your finishing crew with dependable tools from brands like Hyde, USG Sheetrock Tools, Columbia Taping Tools, or Marshalltown. For a full breakdown of essential finishing gear, explore the definitive guide to drywall finishing supplies.
Perimeter Sealing and Acoustic Decoupling Maintenance
A decoupled ceiling must float freely on its rubber isolation clips. If you apply rigid drywall tape and standard joint compound directly into the ceiling-to-wall corner angles, the rigid joint will transmit vibrations directly from the ceiling into the adjacent wall studs.
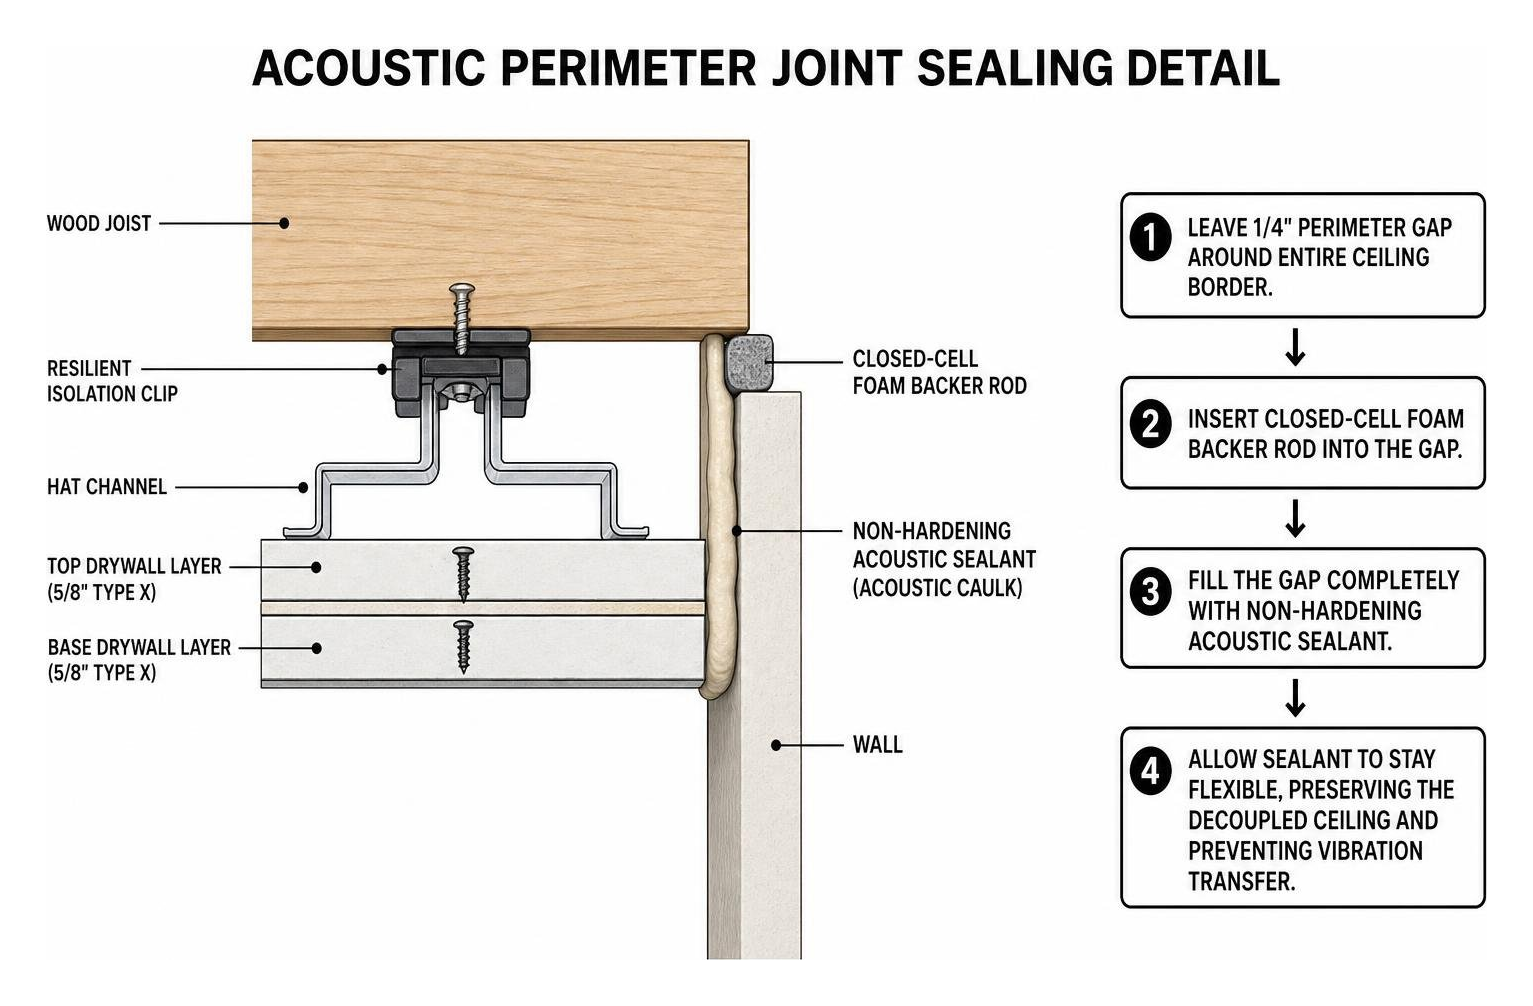
Instead, maintain a 1/4-inch perimeter gap around the entire ceiling border. Insert closed-cell foam backer rod into the gap, then fill the perimeter channel completely with a thick bead of non-hardening acoustic sealant. Acoustic caulk stays flexible for decades, allowing the decoupled ceiling to absorb kinetic vibration without cracking or transmitting flanking sound down the perimeter walls. For complementary structural and finishing approaches, explore quiet comfort a comprehensive guide to acoustic ceiling solutions.
Balancing Sound Blocking and Room Acoustics in Shared Spaces
Soundproofing focuses primarily on sound blocking (stopping sound from entering or leaving a room), but interior comfort also requires managing sound absorption (controlling echo, flutter, and reverberation within the room itself).
Two primary metrics govern this balance:
- Ceiling Attenuation Class (CAC): Measures an overhead ceiling’s ability to act as a barrier against airborne sound transmission between adjacent rooms through a shared plenum space.
- Noise Reduction Coefficient (NRC): Measures the percentage of sound energy absorbed by a surface rather than reflected back into the room. Ratings range from 0.00 (perfect reflection) to 1.00 (perfect absorption).
High performance ceiling systems with balanced acoustics achieve an NRC of 0.70 and a CAC of 30 or greater. In commercial offices, finished basements, and multi-family units with shared return-air plenums, unsealed ceiling joints can allow sound and dust to bleed through plenum spaces.
To achieve architectural beauty without sacrificing performance, spaces requiring lay-in modular ceilings or high-performance acoustic surfaces benefit from high-NRC solutions. For example, CertainTeed acoustical ceiling tiles offer exceptional sound absorption alongside clean visual aesthetics, effectively controlling noise bleed between adjacent spaces. Read more about controlling internal reverberation in our article on sound absorbing ceilings the secret to a quieter environment.
Critical Mistakes to Avoid in DIY Ceiling Soundproofing
Ceiling soundproofing projects fail most often from minor installation oversights rather than poor material quality. Avoid these common pitfalls during planning and installation:
- Rigid Fastener Bridging: Driving extra-long screws through the drywall and hat channel directly into the ceiling joists destroys mechanical decoupling. The screw becomes a direct steel bridge that channels impact noise straight through.
- The Triple-Leaf Effect: Installing resilient channel or light framing directly over existing drywall without removing it creates an accidental secondary air resonance cavity. This resonance can actually amplify low-frequency bass and footfall thuds compared to a single larger cavity.
- Over-Compressing Cavity Insulation: Cramming high-density insulation into a shallow joist bay until it presses hard against both the subfloor and ceiling drywall creates a physical bridge that conducts vibration across the framing.
- Neglecting Electrical and HVAC Penetrations: Leaving unsealed gaps around recessed light housings, smoke alarms, and HVAC supply diffusers ruins acoustic performance. Always seal electrical rough-in boxes with moldable acoustic putty pads and use surface-mounted fixtures or airtight enclosures.
- Using Standard Caulking Instead of Acoustic Sealant: Standard painter’s caulk or silicone dries into a hard, rigid bead that eventually shrinks, dries out, and cracks under subtle ceiling movement. Use only permanently flexible, non-hardening acoustic sealant.
Frequently Asked Questions About Ceiling Soundproofing
Can I screw resilient channels directly over existing ceiling drywall?
No. Screwing resilient channels directly over existing drywall creates a thin, enclosed air gap between the old gypsum and the new layer. This trapped cavity acts as a mechanical spring, creating a “triple-leaf” acoustic system. This assembly lowers isolation performance at resonant low frequencies, often making footstep thumping sound louder downstairs. Resilient channels and isolation clips must be fastened directly to bare, exposed joists.
How many decibels of noise reduction can I realistically achieve?
When executed properly, an engineered decoupled ceiling assembly delivers substantial acoustic isolation. For instance, a DIY soundproofing ceiling project (including Green Glue, RSIC clips, drywall, hat channel, etc.) cost approximately $1,834 and improved the worst sound in the bedroom by 20dB. In human hearing perception, a 10 dB drop represents a 50% reduction in perceived loudness; a 20 dB reduction makes disruptive overhead sounds seem four times quieter, turning loud impacts into distant, dull thumps.
Will adding insulation alone stop footstep noise from upstairs?
No. While cavity insulation is essential for absorbing airborne frequencies and dampening resonance inside hollow joist bays, it does not stop mechanical vibration. Footsteps generate structure-borne energy that travels through the subfloor into the solid joists. Because the joists remain connected to the ceiling, the sound bypasses cavity insulation entirely. Mitigating footstep noise requires mass combined with mechanical decoupling clips and hat channel.
Conclusion
Successfully soundproofing a ceiling comes down to diagnosing your specific noise problem and applying the right combination of mass, damping, absorption, and decoupling. Whether you choose to add a damped second layer of 5/8-inch drywall for conversational airborne noise or perform a complete joist-level teardown with RSIC-1 isolation clips to silence heavy upstairs footsteps, attention to detail during installation makes all the difference.
At Western Wholesale Supply, we are an independent, veteran-owned, third-generation family business supplying commercial-grade drywall, steel framing, insulation, and acoustical ceiling materials. Serving builders, contractors, and homeowners across Eastern Idaho and Western Wyoming since 1963—including our regional communities in Idaho Falls, Pocatello, Jackson, Rexburg, and Twin Falls—we pride ourselves on reliable, on-time jobsite delivery and deep product expertise backed by over 60 years in the trade.
For more technical installation advice and step-by-step guidance on soundproofing materials, explore our comprehensive drywall soundproofing guide or contact our team to source high-performance gypsum panels, fasteners, and acoustic isolation accessories for your next build.
