

Identifying Your Ceiling System Type
To replace ceiling tiles quickly without creating a mess, lay drop cloths beneath your work area, push the damaged drop tile upward into the plenum, tilt it diagonally, and lower it out of the grid. For direct-mount panels, score an “X” through the tile face, pry out the center pieces to protect adjoining interlocking edges, and adhere the replacement with construction adhesive or staples. Scoring replacement tiles face-up with a sharp utility knife over a drop cloth prevents airborne dust and ensures clean, precise cuts.
Before grabbing tools or buying replacement panels, you must determine which style of ceiling you are dealing with. Ceilings generally fall into one of two categories: suspended drop ceilings or direct-mount systems. Knowing the difference dictates your removal strategy, how much overhead clearance you have, and the type of replacement material you need to source.
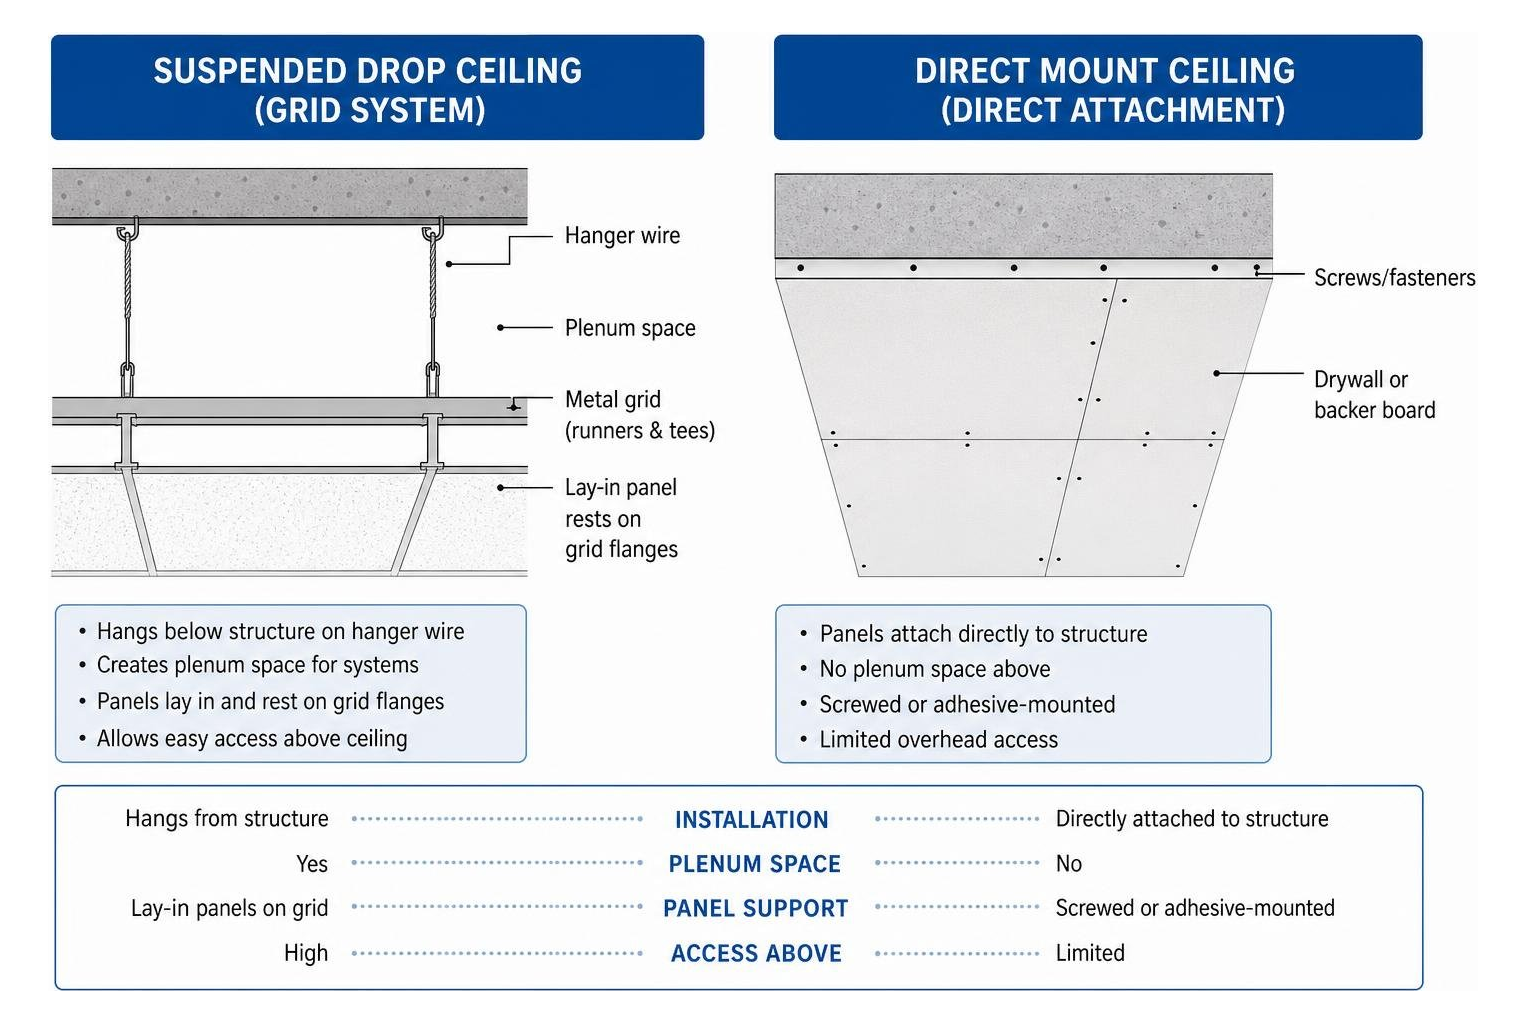
Suspended Drop Ceiling Grid Systems
Suspended systems—often referred to as drop ceilings or T-bar ceilings—hang below the main structural framing via heavy-gauge hanger wire. This creates a functional plenum space that conceals wiring, plumbing runs, and HVAC ductwork while allowing convenient access for repairs.
These grids use interconnected metal runners and tees that support lay-in panels. The panels rest directly on the flanges of the metal grid. When shopping for replacement panels, you will encounter two main edge details:
- Square Lay-In Edges: The tile sits flat on the grid flange, with the metal grid remaining fully flush and visible across the entire ceiling plane.
- Tegular (Reveal) Edges: The panel features a routed perimeter step that drops the face of the tile slightly below the grid line, creating an architectural reveal or shadow line.
If you are upgrading or repairing an existing system, you can explore premium suspended solutions through our dedicated page on acoustical ceilings. When inspecting your current setup, also check the condition of the metal tracks; our detailed overview of ceiling grid supply components explains how main tees, cross tees, and perimeter trims work together to keep the overhead plane level.
Direct-Mount Glue-Up and Staple-Up Tiles
Direct-mount ceilings attach directly to a solid substrate, such as drywall, existing plaster, or wooden furring strips fastened across open joists. Instead of laying loosely in a metal framework, these tiles are permanently secured using either heavy-duty construction adhesive daubs, staples, or drywall fasteners.
Most direct-mount units measure 12×12 inches and feature interlocking tongue-and-groove edges. The tongue conceals the stapling flange so that the mechanical fasteners remain completely hidden once the adjacent tile slides into place. Substrate leveling is critical for these systems; if the underlying framing or plaster is uneven, furring strips must be shimmed to ensure a flat installation plane.
Essential Preparation and Safety Protocols
Working overhead carries distinct hazards, from falling dust and insulation debris to hidden electrical lines. Setting up your workspace correctly takes only a few minutes and prevents hours of cleanup or dangerous mishaps.
Before beginning any physical work:
- Shut Off Electrical Power: Switch off the circuit breakers feeding any light fixtures, ceiling fans, or junction boxes situated within or near the workspace.
- Contain the Dust: Lay heavy canvas or polyethylene drop cloths over flooring, furniture, and equipment directly below the ceiling section being serviced.
- Set Up Stable Footing: Use a sturdy, OSHA-compliant stepladder or rolling scaffold. Never overreach; keep your belt buckle between the ladder side rails.
- Equip Personal Protective Equipment (PPE): Wear snug-fitting safety glasses to shield your eyes from falling mineral dust, heavy-duty work gloves to prevent blade slips and fiber irritation, and an N95 respirator mask.
Resolving Underlying Moisture and Environmental Issues
Never replace a water-stained or sagging ceiling tile without first locating and permanently repairing the moisture source. Simply popping in a fresh tile under an active leak is a recipe for repeat damage within weeks.
- Roof or Pipe Leaks: Inspect the plenum space above the damaged tile using a bright flashlight. Check overhead plumbing joints, valves, and roof decking for active dripping or water tracks.
- HVAC Condensation: Uninsulated ductwork frequently sweats during hot summer months, dripping condensation directly onto ceiling panels. Wrap cold-air supply runs with proper duct insulation.
- Bathroom & Exhaust Ventilation: Ensure bathroom and kitchen exhaust fans vent entirely to the exterior of the building rather than terminating into the open ceiling plenum.
- Mold Remediation: If you discover mold growth on tiles, surrounding drywall, or framing, treat the framing with an EPA-registered antimicrobial wash and completely discard the contaminated porous tiles.
Handling Asbestos and Hazardous Materials
If your commercial or residential property was built prior to 1980, the existing ceiling tiles or direct-mount adhesives may contain regulated asbestos fibers. Asbestos was widely utilized in early acoustic tiles and mastics for fireproofing and thermal insulation.
- Do Not Disturb: Do not saw, snap, sand, or scrape suspected tiles without prior verification.
- Lab Testing: Cut a small, coin-sized sample while wearing an N95 mask, seal it in a double ziplock bag, and send it to a certified NVLAP testing laboratory.
- Abatement: If test results confirm the presence of asbestos, hire a licensed abatement contractor to remove the material safely according to local environmental regulations before proceeding with your renovation.
Step-by-Step Ceiling Tile Replacement Process
Replacing tiles neatly requires a systematic approach, whether you are dealing with a standard suspended framework or direct-mount tongue-and-groove panels. Having the right tools on hand—including a sharp utility knife, extra replacement blades, a metal straightedge, a measuring tape, and quality drywall finishing tools from brands like Marshalltown, Hyde, USG Sheetrock Tools, or Columbia Taping Tools—ensures professional results.
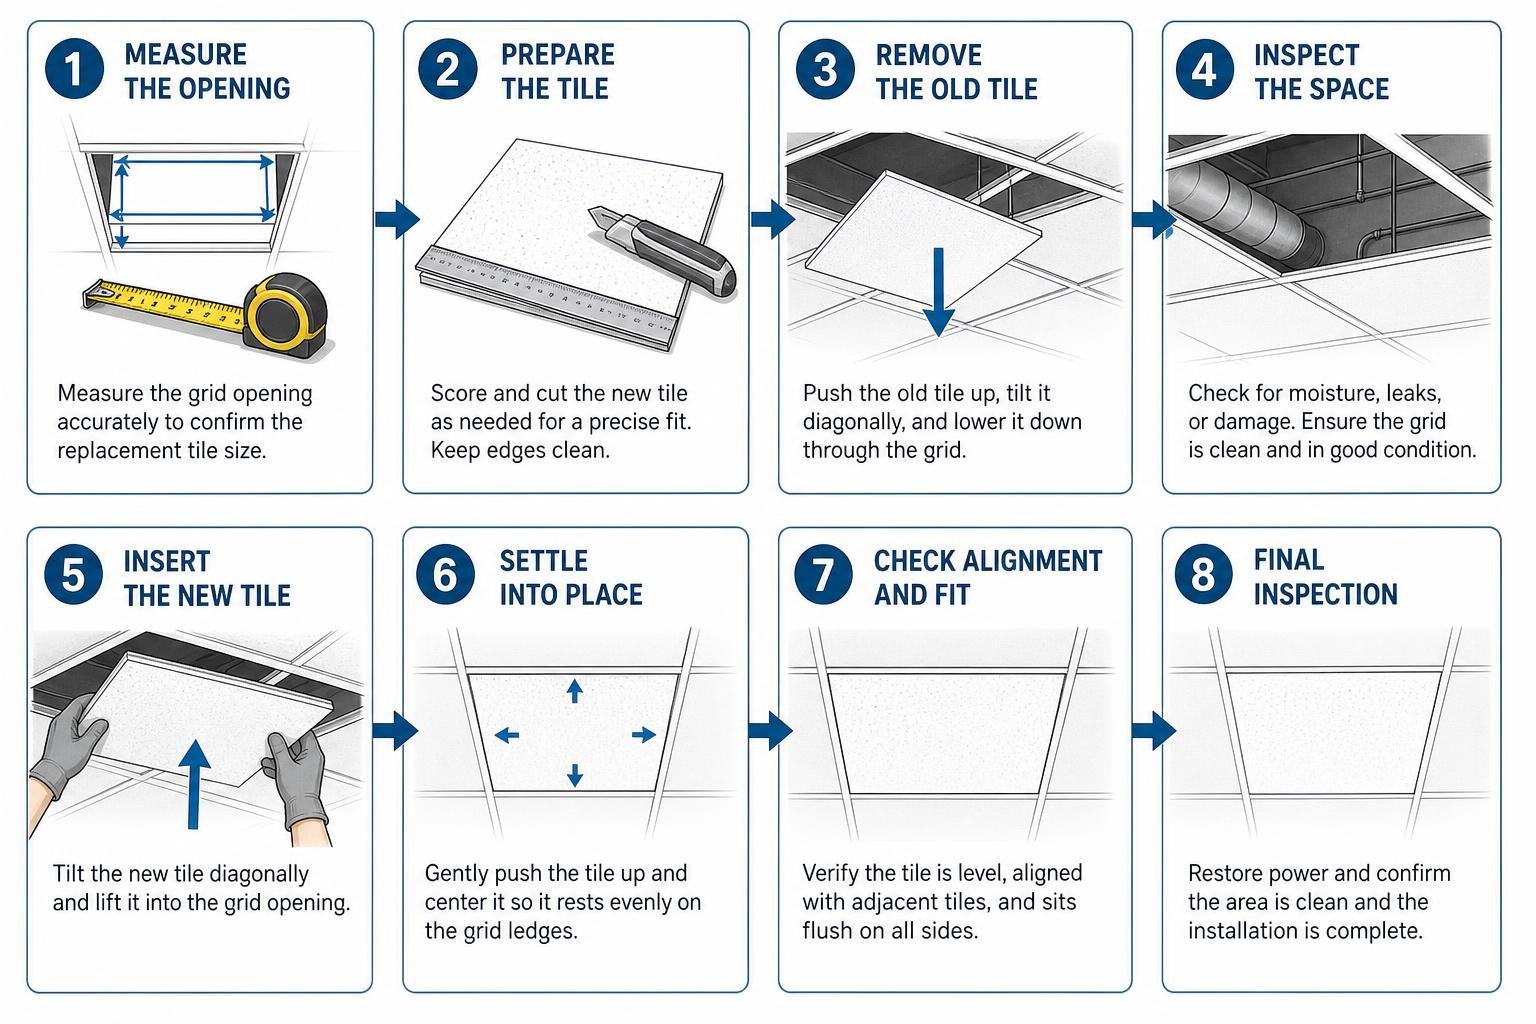
Executing Drop Ceiling Tile Replacement
Replacing a panel in a suspended grid is straightforward:
- Remove the Old Tile: Gently push the damaged tile upward into the plenum space above the grid. Tilt the tile diagonally across the grid opening, then lower it down through the frame.
- Vacuum the Grid: Before putting in the new panel, wipe down or vacuum the exposed metal grid flange to remove old dust, loose fiberglass, or spiderwebs.
- Inspect Surrounding Grid Alignment: Check that the main tees and cross tees remain square and level. If the grid wires have slackened, twist the hanger wire to level the runners.
- Cut Border Tiles to Dimension: If the tile sits against a perimeter wall, measure the distance between the inside of the grid tee and the perimeter wall angle. Lay the new tile face-up on a flat scrap board, mark your cut line with a pencil, align your metal straightedge, and score the face firmly with a sharp utility knife. Make multiple shallow scores rather than forcing a heavy cut in one stroke.
- Slide the Replacement Tile into Place: Tilt the new panel diagonally, pass it upward through the grid opening, rotate it horizontally, and let it rest squarely on the metal flanges.
For the best visual and acoustic outcome, choose high-grade mineral fiber tile options or durable fiberglass ceiling panels manufactured by CertainTeed.
Executing Glue-Up or Staple-Up Ceiling Tile Replacement
Direct-mount tiles require a bit more finesse to isolate and replace without damaging neighboring tiles:
- Score the Damaged Tile: Using a utility knife, score an “X” deeply through the center face of the damaged tile.
- Pry Out the Center: Pry out the triangular sections from the center outward using a stiff putty knife. This allows you to work toward the edges without breaking the delicate tongue-and-groove joints of adjacent panels.
- Clean the Substrate: Scrape away old adhesive residue down to the solid drywall or wood furring. If stubborn mastic remains, warm it gently with a heat gun on low heat to soften it. Remove any exposed, bent staples.
- Prepare the Replacement Tile: If sliding a tile into an existing field where surrounding grooves are locked, carefully slice away the rear flange of the replacement tile’s tongue using a sharp utility knife. This allows the tile to be inserted directly from the face without disturbing neighboring pieces.
- Apply Adhesive or Fasteners: Apply golf-ball-sized daubs of high-tack ceiling adhesive roughly 2 inches inward from each corner on the back of the tile, or secure the flange into 1×3 furring strips using heavy-duty staples or Grabber brand drywall screws.
- Maintain Perimeter Gaps: Leave an expansion gap of roughly 1/16 inch at perimeter walls to accommodate seasonal humidity changes.
Navigating Obstacles and Matching Profiles
Ceilings are rarely completely unobstructed planes; you must frequently trim around recessed light cans, HVAC supply grilles, fire sprinklers, and plumbing pipes.

- Circular Light Openings & Pipes: Measure the precise center coordinates from the nearest grid tees to the center of the obstacle. Transfer these dimensions to the face of your tile. For round cuts, use an adjustable circle hole cutter or a fine-toothed coping saw. Always cut the opening slightly smaller than measured to allow for fine test-fitting.
- Paper Templates for Irregular Shapes: When cutting around structural posts, conduit runs, or angled walls, tape together sheets of heavy paper to create a 1:1 template. Trace the obstruction, test the paper template against the opening, and transfer the outline directly onto the tile face.
- HVAC Diffusers & Return Grilles: Turn off the air handler before working around diffusers to keep dust from blowing through ductwork. Ensure metal diffuser frames sit securely on the grid flanges without placing downward stress on adjacent mineral tiles.
Matching Texture, Color, and Edge Details
One common challenge in ceiling repair is making a newly installed tile blend seamlessly with an older ceiling. Over time, UV light, ambient airborne dust, and oxidation cause older ceiling tiles to yellow or shift in tone.
| Profile Feature | Key Matching Consideration | Recommended Action |
|---|---|---|
| Edge Detail | Square edge vs. Tegular reveal depth (9/16″ vs. 15/16″) | Measure the reveal step-down depth precisely with a caliper or rule. |
| Surface Texture | Fissured, fine-fissured, smooth, or perforated | Match the manufacturer pattern closely using sample swatches. |
| Color Tone | Aged yellowing vs. factory bright white | If isolated panels clash visibly, replace an entire row or spray-paint the whole field. |
| Grid Width | Standard 15/16-inch grid vs. slim 9/16-inch fine-line grid | Verify grid flange width before ordering replacement panels. |
If you are trying to source the right components for an upgrade, review our comprehensive buyer’s guide to ceiling supplies. If exact discontinued textures cannot be found, replacing a clustered 4-tile or 6-tile zone around a light fixture creates a visually deliberate accent while preserving the surrounding field.
Project Cost Breakdown and Grid Preservation
Understanding project costs helps property owners make smart renovation decisions. The single largest money-saving factor in any drop-ceiling renovation is preserving the existing metal grid. If the metal tees remain straight, rust-free, and properly supported, leaving the grid in place and simply swapping out panels saves substantial labor and material expenses.
| Scope / Material Scenario | DIY Approach (Per 100 Sq. Ft.) | Professional Turnkey (Per 100 Sq. Ft.) |
|---|---|---|
| Standard Vinyl Panels (Grid Preserved) | Low material expense | Moderate labor + materials |
| Acoustical Fiberglass Panels (CertainTeed) | Mid-tier material expense | Mid-tier labor + materials |
| Mineral Fiber & Specialty Acoustic | Premium material expense | Higher labor + materials |
| Full Tear-Out & New Grid Installation | High DIY material & hardware | Full commercial labor + materials |
| Disposal, Prep & Painting Work | Minimal dumpster/prep cost | Additional debris & site prep rates |
To get a broader perspective on national price trends and per-square-foot variations across different material tiers, you can review ceiling tile replacement cost benchmarks. Before purchasing your materials, calculate your exact panel quantities and waste factor using a ceiling tile calculator estimation to ensure you order the right volume for your space.
Frequently Asked Questions About Ceiling Tiles
Can I replace just one water-stained ceiling tile?
Yes, you can easily replace a single tile in a drop-ceiling grid once the underlying moisture issue is resolved. However, keep in mind that the new tile may appear significantly brighter than surrounding panels due to age, oxidation, and dye-lot variations. If the color difference is noticeable, consider swapping a small cluster of adjacent tiles or lightly coating the entire ceiling field with a breathable acoustical ceiling paint.
How do I know if my old ceiling tiles contain asbestos?
Visual inspection alone cannot definitively determine if a ceiling tile contains asbestos. If your building was constructed prior to 1980 and features 12×12-inch staple-up or older mineral fiber drop tiles, treat them as potentially hazardous. Have a certified testing laboratory analyze a small, sealed sample before cutting, scraping, or disturbing the ceiling.
What is the cleanest way to cut ceiling tiles without dust?
To minimize airborne dust, place the ceiling tile face-up on a clean, solid work table over a drop cloth. Use a fresh, sharp utility blade guided by a heavy metal straightedge. Score the face smoothly in two or three firm passes rather than attempting to hack through the dense core in one heavy cut. Keep a HEPA-filtered vacuum handy to immediately clear debris from the edge bevels.
Conclusion
Upgrading stained, damaged, or sagging ceiling panels restores overhead aesthetics, enhances room acoustics, and protects your property’s value. Whether you are replacing a few water-damaged panels in an office or doing a full layout refresh, taking careful measurements and choosing compatible materials ensures a clean, professional finish.
At Western Wholesale Supply, we are an independent, veteran-owned, third-generation family business supplying top-grade building materials—including drywall, steel framing, commercial insulation, and CertainTeed acoustical panels. Serving Eastern Idaho and Western Wyoming since 1963, we deliver the materials and hands-on expertise you need across our regional showrooms in Idaho Falls, Pocatello, Jackson, Driggs, Rexburg, Twin Falls, and surrounding communities.
Ready to refresh your ceiling? Explore our complete line of reliable acoustical ceiling solutions or stop by your nearest Western Wholesale Supply showroom today to find the right panels and accessories for your project.
